Saturday, June 2, 2012

Maven, Android, Travis-CI and More Awesome Sauce

Background

Recently I started working on an Android application for a side project.  From the beginning, one thing I wanted to accomplish was to setup continuous integration from the get-go.  After looking into it for a bit, I discovered that there were three potential options for me:
Of those three options, the only one that would allow me to test my application on an actual Android emulator was the first, and since I wanted to spend exactly $0 towards it, the latter two were more appealing.  Since I have traditionally used Jenkins in the past for my Android applications, I decided to go with a combination of Maven, the maven-android-plugin and travis-ci for this project.

I don't blog much (as you can see), but after a bit of struggle with getting this building successfully on travis-ci I decided to share my experiences with this.  I have made the example test project available on Github.

Creating the Project

Using the maven-android-plugin, I created the skeleton application using the example on android-quickstart-archetype.  Here is the command that I used for my sample project:


The only information that you need to modify from this example would be the groupId, artifactId and the platform that you are building for (note this).  This should be enough to build your project using the mvn install target.

Setting Up Travis-CI

If we add a vanilla .travis.yml file to our application, you'll notice that out of the box we will get a build failure.


Not surprisingly it is because the travis-ci build agents do not have any sort of android environment setup on them.   To get around this, we will need to take advantage of the various hooks in the build lifecycle that travis-ci provides you to setup an android environment prior to building our application.  In order to do this, we will need to do the following in our .travis.yml:
  • download the latest android SDK and unzip it
  • setup the ANDROID_HOME environment variable to point to the SDK that we downloaded
  • fix up our PATH variable to point to the tools and platform-tools directory in our SDK
  • tell our android environment to update our local SDK with the target API that we are building our application for

Choosing the Right Environment

Since travis-ci has a limited amount of space that we can take up and the full Android environment is huge, we will need to tell android to only grab the specific SDK that our application is building for.  To find this information out, you can run the android list sdk command from your terminal.  Doing so will give you a list of what is available to update.  Since we are targeting our application for API Level 10, we will want to note the package number (9).


Platform To Stand On

In addition to choosing the proper platform SDKs that your application builds for, you'll also want to be sure to include both the Android Tools and Android Platform Tools (options 1 and 2) for the SDK that you are targeting.

Robolectric

For those that haven't at least checked out Robolectric to test drive your Android applications, do yourself a favor.  I had heard about Robolectric when I first started writing Android applications, but at the time thought it would be more prudent to use the tools available through android.test.  Currently, I support a good mixture between Robolectric at the unit level and android.test at the integration level, but that is a topic for another blog post. 

Including Robolectric In Your pom.xml

Robolectric has a good quick start guide to adding it to your Maven project.  The general idea is to have entries for Robolectric and JUnit in your <dependencies /> entry of your pom.xml.  For this project, I've just added a simple test that verifies we get the proper greeting message when the application starts.  Listed below are my HelloAndroidActivityTest.java and my pom.xml.


Putting It All Together

Now that you know what API level to include and our Maven project is setup to build our test, the only thing left to do is to perform the steps needed in the before_install portion of our .travis.yml.  Here is what our resulting file looks like:


And there you have it.  After setting up the appropriate android environment in the travis-ci environment, we are now green.

Summary

Though this is a rudimentary example, I still think it is cool to see how powerful travis-ci can be.  I would also like to explore setting up some integration level tests in travis-ci using something similar to how Jenkins uses the XVNC plugin to run an emulator on a server.

Wednesday, December 29, 2010

iTunes Genius Playlists to Windows Media Center


Since cutting the cord of cable television I only use Windows Media Center to manage my media throughout my household.  Once of the nice things about WMC is its ability to broadcast content across your local network to various WMC Extenders such as the Xbox 360 so you can share media such as movies, TV tuners (for over-the-air channels) as well as music.

Being the lazy person that I am, I rarely spend the time to put together a sweet playlist, which is why I fell in love with Genius playlists in iTunes.  Genius playlists allow you to generate a playlist in your music collection based on an individual song.
Genius Playlists
It scans your entire music library to pick songs that it thinks you would enjoy based on the song that you are generating the playlist from, and in my experience it does an excellent job as well.
Foo Fighters - Genius List
Since neither Media Center or Media Player offer this type of functionality, there are few options if you are lazy for getting nice playlists generated for listening to them via WMC.  I searched the tubes of the internet looking for some sort of plugin that might enable me to integrate iTunes and WMC but to no avail.  The closest thing I found was MCE Tunes, which was not necessarily free if you wanted the cooler features of it and the only thing I found on the internet that walked you through creating a WMC playlist from a Genius playlist involved copying the physical files from your Genius playlist into a directory and creating a playlist from it.

Having not found a suitable solution, I decided to see what sort of options iTunes had with its playlist.  After generating a playlist, I chose to save it, in hopes that a file would be generated that would be easy enough for me to script something to automatically generate a playlist that would be compatible with WMC.  Sure enough, I noticed that there was an "Export..." option for the playlist.

Conveniently, iTunes will export the playlist into a tab delimited format, perfect for retrieving the information that I would need to create a playlist automatically to be used by WMC.  The next task was to figure out what sort of format WMC needed for its playlists.  To do so, I generated a new playlist of one song and chose to "Open File Location" from the context menu.  In the directory was my Test.wpl file.  Opening this revealed a simple XML document for saving playlist information.

  1. <?wpl version="1.0"?>
  2. <smil>
  3.     <head>
  4.         <meta name="Generator" content="Microsoft Windows Media Player -- 12.0.7600.16667"/>
  5.         <meta name="ItemCount" content="0"/>
  6.         <title>Test</title>
  7.     </head>
  8.     <body>
  9.         <seq>
  10.             <media src="J:\cdmp3\Foo Fighters\The Colour And The Shape\03_Hey, Johnny Park!.MP3" />
  11.         </seq>
  12.     </body>
  13. </smil>

The only thing that was left to do was to transform the tab-delimited playlist file into the XML document that WMC expects.  I opted to write a simple PowerShell script to achieve this.  PowerShell is installed by default on the Windows 7 operating system and is quite powerful.  Below is the resulting PowerShell script that will generate a WPL file based on an exported Genius playlist.

  1. $baseXml = "<?wpl version='1.0'?>
  2. <smil>
  3.    <head>
  4.        <meta name='Generator' content='Microsoft Windows Media Player -- 12.0.7600.16667'/>
  5.        <meta name='ItemCount' content='0'/>
  6.        <author/>
  7.        <title>Test</title>
  8.    </head>
  9. </smil>"
  10. $xml = new-object xml
  11. $xml.LoadXml($baseXml)
  12. $xml.smil.head.title = $args[1]
  13. $lines = [System.IO.File]::ReadAllLines($args[0])
  14. $location = 0
  15. $count = 0
  16. $body = $xml.CreateElement("body")
  17. $seq = $xml.CreateElement("seq")
  18. $xml.smil.AppendChild($body)
  19. $body.AppendChild($seq)
  20. foreach($line in $lines) {
  21.     if( $count -eq 0 ) {
  22.         foreach($col in $line.Split("`t")) {
  23.             if( $col -ne "Location" ) {
  24.                 $location = $location + 1              
  25.             } else { "Location column:  " + $location }    
  26.         }      
  27.     }
  28.     else {
  29.         $song = $line.Split("`t")[$location]
  30.         $el = $xml.CreateElement("media")
  31.         $el.SetAttribute("src", $song)
  32.         $seq.AppendChild($el)
  33.     }
  34.    
  35.     $count = $count + 1
  36. }
  37. $xml.Save($home + "\\" + $args[1] + ".wpl")

The script expects two arguments, the first being the path to the tab-delimited Genius playlist file that was exported earlier and the second being the name of the new playlist that is being generated.  The beginning of the script has the base XML structure that is needed for a WPL file.  The only caveat that I ran into while writing this script was that when you load an XmlDocument object, when you try to drill down and reference an XML node that doesn't have any inner elements, PowerShell interprets the node as a string rather than an XmlElement.  What this means is that if I had a hardcoded the <body><seq /></body> in the XML, I would not be able to reference it with $xml.smil.body.seq.AppendChild($elas I would get an error stating "Method invocation failed because [System.String] doesn't contain a method named 'AppendChild'."  To get around this, the script dynamically generates the <body /> and <seq /> elements during execution.  The rest of the script was pretty easy from there:
  • Reads each line from the tab-delimited file
  • Since the first line contains header information, the script locates the column # of the "Location" column so we know where the file resides
  • For every non-header line, it appends a <media src="" /> element to the <seq /> element
  • When finished, it saves the resulting WPL file in the current user's "Home" directory
In order to run this script on Windows 7, you'll have to first set the execution policy to RemoteSigned in order to run it.  To do so, you will first have to run PowerShell as an Administrator by right clicking on PowerShell and choosing to do so.


Set-ExecutionPolicy RemoteSigned

After running the Set-ExecutionPolicy cmdlet, you are all set to go.  Simply go to where you've saved the PS1 file and run it like so:


PS C:\Users\Levi> .\geniustowmc.ps1 "C:\Users\Levi\Desktop\Hey, Johnny Park!.txt" "Foo Fighters"


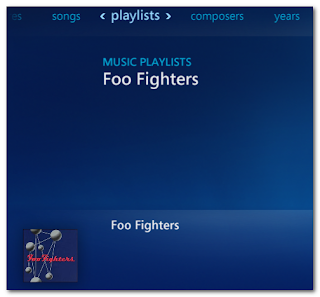
When finished, there should be a "Foo Fighters.wpl" file in your Home directory on your computer.  Simply move this file into your Playlists folder (this was found when you chose to "Open File Location" in WMP above) and both WMP and WMC will automatically recognize the newly created playlist.


If you've found a better way to achieve this, please let me know.  For now, this 3-step method for creating awesome playlists to be used by WMC will suffice.